Creative Minds 𖹭 Happy Hearts

Testing Lung Capacity with a Balloon and Water Displacement
Lungs are invisible, but water displacement makes them measurable. Testing lung capacity with a balloon gives your student a real number, in milliliters, for the air their lungs actually hold.
Your student blows air into a round balloon, submerges it in a water-filled container, and records how far the water level rises. That rise equals the volume of air in the balloon, which models their lung capacity in milliliters. The sheet is suited for grades 4 through 7 and walks through all seven steps, from stretching the balloon before inflating to calculating volume by subtracting starting water level from the new water level.
Testing lung capacity with a balloon fits naturally into a human body unit study, a respiratory system lesson, or a standalone hands-on measurement activity. The data table includes three trial rows plus a best-result row, so your homeschooler practices both repeated trials and identifying their strongest result. Three think-and-reflect questions at the bottom ask what factors might affect results and how lung capacity could be improved, moving the lab from data collection into genuine scientific reasoning.
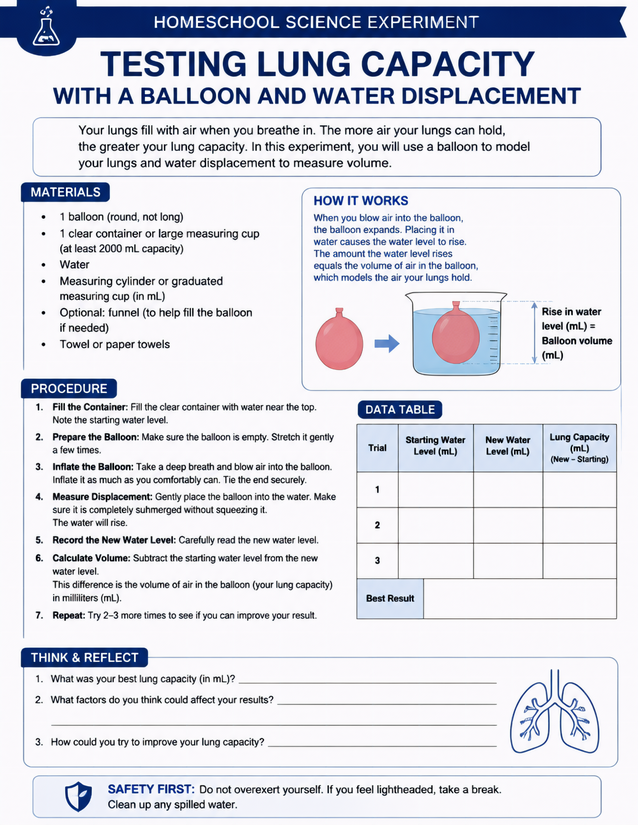
Grades 4-7 homeschoolers measure lung volume by testing lung capacity with a balloon and water displacement. Three recorded trials included.
Recording Results for Testing Lung Capacity with a Balloon

Usage Notes
Nearly everything on the materials list is already in the house: a round balloon, water, and a large clear container holding at least 2000 mL. The one specialty item is a measuring cylinder or graduated measuring cup that reads in milliliters accurately enough to capture the water level difference between trials. The sheet includes a safety note reminding students not to overexert, so brief it before your student inflates.

Printing Tips
Twenty-four-pound paper or standard copy paper holds up fine here since the sheet stays on a clipboard away from the water container. Slide it into a page protector if your homeschooler tends to work with wet hands, or print a second copy so Trial 3 is not recorded on a damp sheet.