Creative Minds 𖹭 Happy Hearts

Testing the Sugar Content of Different Fruits, Benedict’s Solution Lab
Five fruits, one chemical indicator, and a hot water bath reveal exactly which snack is hiding the most sugar. Your student records color changes against a Benedict’s solution chart to find the answer.
Designed for grades 5 to 7, this lab guides your homeschooler through a hands-on investigation of the sugar content of different fruits using Benedict’s solution as a colorimetric indicator. Students mash or blend 4 to 5 fruits, filter the juice, combine it with Benedict’s solution in labeled test tubes, and observe color changes after five minutes in a hot water bath. The results table asks them to record the color observed, the corresponding sugar level from the provided chart (blue for no sugar through brick red for high sugar), and any additional notes, followed by three written conclusion prompts.
This experiment fits naturally into a nutrition unit study, a chemistry introduction, or a broader biology sequence on plant biology and natural compounds. It works as a standalone one-session lab or as a comparison point alongside related experiments on liquid chemistry. Completing it asks your student to follow a multi-step procedure with precision, interpret chemical evidence against a reference chart, and draw a data-supported conclusion, skills that demonstrate real scientific reasoning.
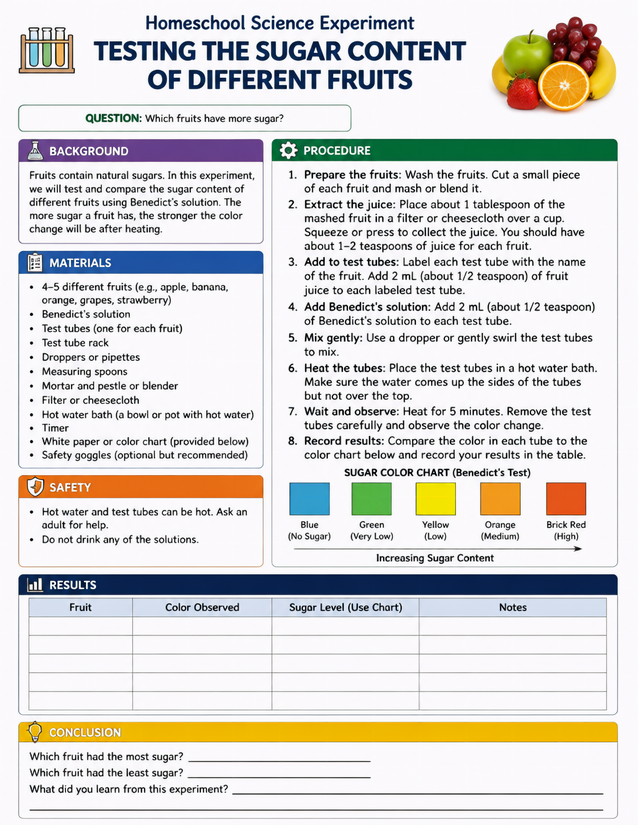
Homeschool grades 5-7 students compare the sugar content of different fruits using Benedict’s solution and a color chart.
Investigating Sugar Content of Different Fruits with Benedict’s Solution

Usage Notes
Most materials here are household or easily sourced: fresh fruit, measuring spoons, a mortar and pestle or blender, and a bowl of hot water from the stove or kettle. Benedict’s solution is the one specialty supply and is available inexpensively from science education retailers. The safety section on the sheet flags that hot water and test tubes can burn, so supervise the heating step closely and have your student wear the recommended safety goggles.

Printing Tips
A standard 24-lb copy paper works well here since students write directly in the results table with a pencil or fine-tip pen. Inserting a printed copy into a dedicated lab notebook keeps the color chart visible alongside the student’s recorded observations when they write their conclusion.