Creative Minds 𖹭 Happy Hearts

Building a Model Lung with a Plastic Bottle
Balloons, a plastic bottle, and a Y-shaped straw are all it takes, and building a model lung suddenly makes breathing make sense in a way a textbook diagram never quite does.
Building a model lung walks your student through assembling a working respiratory model using a 2-liter bottle, three balloons, and a Y-shaped straw or tubing. Two small balloons represent the lungs, the Y-shaped straw stands in for the trachea and bronchi, and a large balloon stretched across the cut base acts as the diaphragm. Pulling and pushing that bottom balloon shows exactly how inhalation and exhalation work, making this a strong fit for grades 3 to 6 studying human body systems.
The sheet fits naturally into a life science unit study on the respiratory system, standing alone as a single-session lab or paired with lessons on gas exchange and circulation. Four reflection questions at the bottom ask your homeschooler to match each model part to its real anatomical counterpart, moving the activity beyond assembly into genuine scientific reasoning. Extension prompts encourage testing different balloon sizes and researching how oxygen passes into the bloodstream, giving advanced students room to go further.
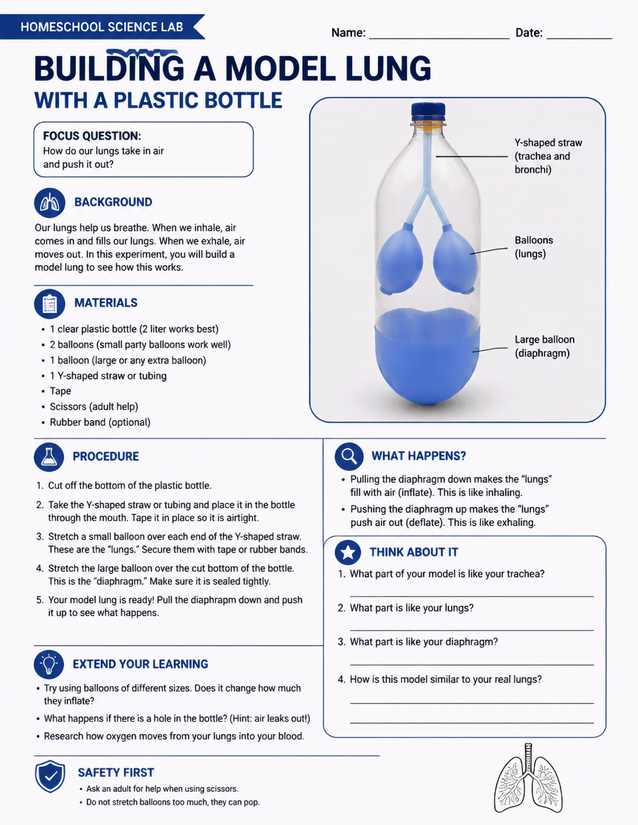
Building a model lung teaches grades 3-6 how inhalation and exhalation work using balloons, a plastic bottle, and a Y-shaped straw.
Investigating Building a Model Lung in Your Homeschool Lab

Usage Notes
Every supply on this sheet is a household or grocery-store item: a 2-liter plastic bottle, three balloons, a Y-shaped straw or flexible tubing, tape, scissors, and an optional rubber band. No specialty equipment is needed, which makes setup quick. The sheet flags one safety note worth passing along before your student begins: scissors are required to cut the bottle bottom, so adult help is listed as a required step, not optional.

Printing Tips
Slip a single printed copy onto a clipboard so your student can reference the labeled diagram while building. Because the procedure involves wet hands and tape, 24 lb paper holds up better than standard copy weight and keeps the ink readable through the whole session.