Creative Minds 𖹭 Happy Hearts

Making a Model of Meiosis with Clay or Beads, 7-Step Lab
Seven steps, four colors of clay or beads, and one diploid cell that becomes four genetically different haploid cells: making a model of meiosis has never been this tangible.
Making a model of meiosis walks your student through every stage of cell division, from Interphase through Meiosis II, using colored clay or beads arranged on a small plate or tray. The sheet provides a model key distinguishing chromosomes from each parent, sister chromatids, and allele variations, so students build an accurate visual representation before they write a single definition. At the end, three Think and Reflect questions ask them to explain crossing over, the genetic importance of four different daughter cells, and how meiosis differs from mitosis. This lab is well matched to grades 7-10 in a homeschool biology or life science unit.
The making a model of meiosis sheet fits naturally into a genetics or cell biology unit study, either as a standalone hands-on session or as the modeling phase that follows a textbook reading on cell division. Because each step is illustrated with plate diagrams showing red and blue X-shaped chromosome pieces, your student can check their physical model against the printed guide at every stage. Completing all seven steps and answering the reflection questions demonstrates that your homeschooler understands both the mechanics of chromosome separation and the biological outcome: genetic variation in gametes.
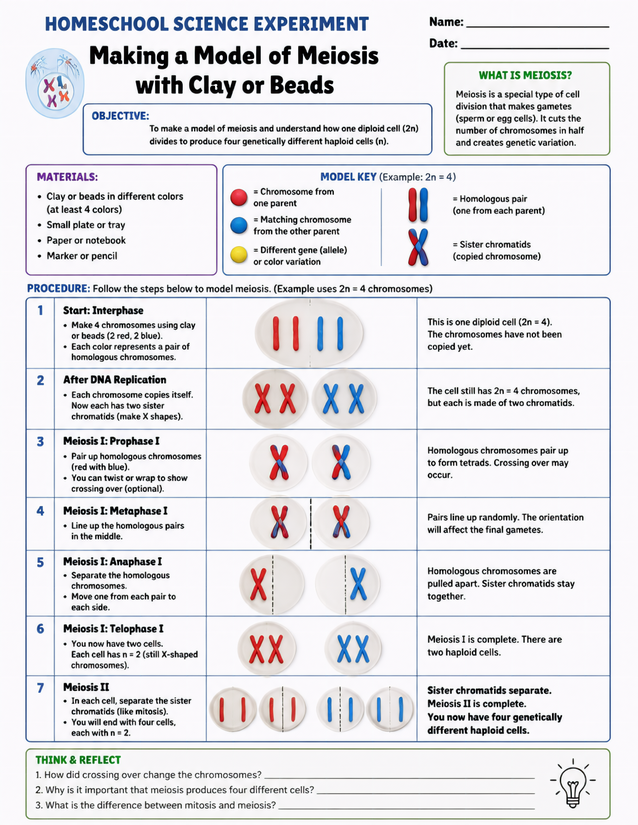
Grades 7-10 homeschoolers build hands-on cell division knowledge by making a model of meiosis using clay or beads across seven sequential steps.
Getting Started with Making a Model of Meiosis

Usage Notes
Clay or beads in at least four colors are the core supply, along with a small plate or tray to arrange each step on. Everything else, a marker or pencil and paper or notebook, is already in most homeschool spaces. No heat or chemicals are involved, though younger students may need guidance keeping the color coding consistent across all seven steps.

Printing Tips
A single 24 lb or heavier sheet keeps the procedure table crisp and easy to read flat on a work surface next to the modeling tray. Loose on a clipboard works well here since students will be moving between the sheet and their clay arrangement repeatedly. Laminating is not ideal because students need to write answers in the Think and Reflect section.