Creative Minds 𖹭 Happy Hearts

Making a Model of the Lymphatic System, Hands-On Lab Sheet
Green-tinted water, a small funnel, and a handful of beads bring the lymphatic system to life in a way no diagram ever quite manages. Making a model of the lymphatic system puts the actual flow of fluid in your student’s hands.
Making a model of the lymphatic system asks your student to lay clear plastic tubing or green yarn across a human body outline, position green beads or pom-poms at lymph node locations including the neck, armpits, chest, abdomen, groin, and behind the knees, then pour green-tinted water through a small funnel to watch lymph travel through vessels and drain out at the bottom. The observation section prompts students to note where the water flowed easiest, and the Think and Answer questions ask them to identify what the beads and tubing each represent and explain why the lymphatic system matters to the body. This lab is well matched to grades 5 through 8 in a homeschool biology or anatomy unit.
As a standalone activity, making a model of the lymphatic system works inside a body systems unit study alongside lessons on the circulatory or immune system, since the sheet itself notes that the lymphatic system filters germs, returns excess fluid to the bloodstream, and transports white blood cells. An extension activity printed on the sheet challenges your homeschooler to label lymph nodes, lymph vessels, the thoracic duct, spleen, tonsils, and bone marrow, then turn the completed model into a poster. By the end, your student can explain the physical path lymph travels and connect the system’s structure to its protective function.
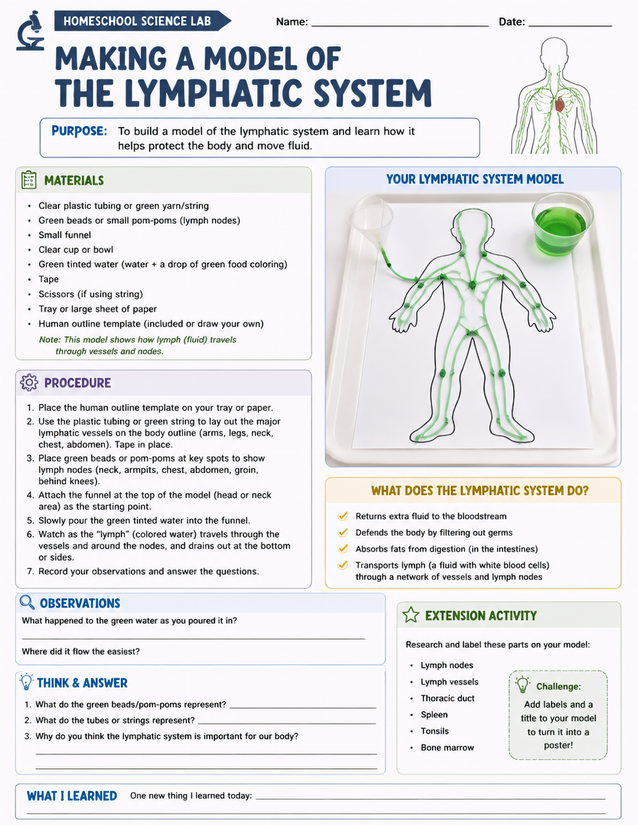
Green-tinted water flows through tubing and beads in this making a model of the lymphatic system lab for grades 5-8.
Getting Started with Making a Model of the Lymphatic System

Usage Notes
Most materials here are genuine household supplies: tape, scissors, a tray or large sheet of paper, and a cup of water tinted with a single drop of green food coloring. The specialty items are minimal: clear plastic tubing or green yarn for vessels and green beads or pom-poms for lymph nodes. The sheet includes a human outline template, so nothing needs to be sourced or printed separately. Pouring liquid directly onto the model means working on a tray is a practical safety step to contain any spills.

Printing Tips
Cardstock at 65 lb or heavier holds up better than copy paper here because the observation and Think and Answer sections will be filled in while the tray is nearby and hands may be damp. Loose sheets on a clipboard keep the recording area flat and away from the wet model; laminating is not practical for a sheet your student writes on.