Creative Minds 𖹭 Happy Hearts

Making a Parachute and Testing Its Descent Rate
Air resistance becomes real the moment your student drops a plastic-bag parachute from a chair. Making a parachute and testing its descent rate puts a stopwatch in their hand and a testable question on the page.
Making a parachute and testing its descent rate anchors this experiment in one clear question: how does parachute size affect how fast it falls? Your student builds three parachutes from plastic sheeting, attaches a small weight, drops each from at least two meters, and records time-to-ground across three trials per size. The data table on the sheet captures area in square centimeters alongside trial times and a calculated average, giving grades 4-6 homeschoolers genuine quantitative practice alongside the core concept of drag.
This lab fits naturally into a physics or forces unit study, and it works as a standalone session or as the second experiment in a sequence on air resistance. A built-in hypothesis prompt, background paragraph on drag and surface area, safety notes, and three conclusion questions mean your homeschooler moves through the full scientific method without needing a separate worksheet. The Think Further box extends the session by prompting comparisons between circular and square canopy shapes.
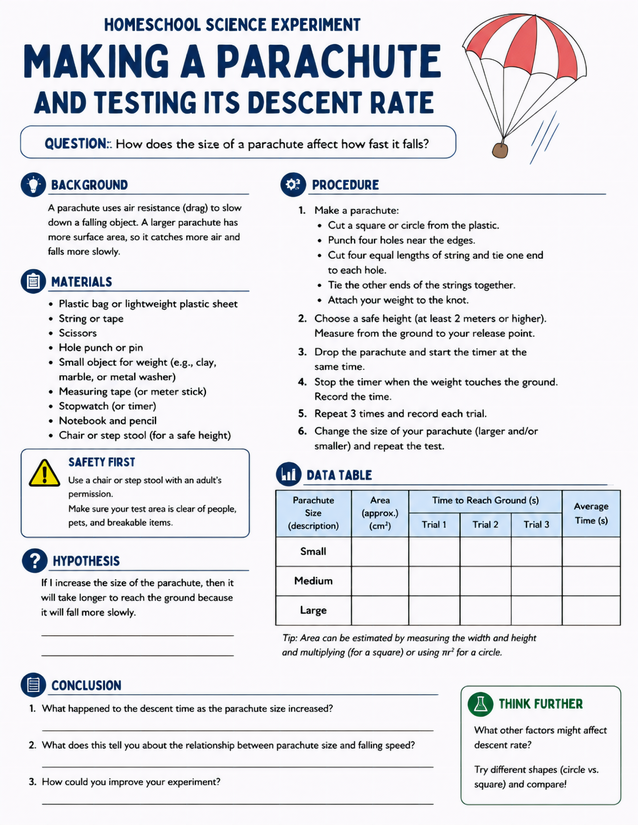
Grades 4-6 homeschoolers explore air resistance by making a parachute and testing its descent rate across three timed trials.
Recording Results for Making a Parachute and Testing Its Descent Rate

Usage Notes
Nearly everything on the materials list is already in the house: plastic bags or lightweight plastic sheeting, string or tape, scissors, a hole punch or pin, and a small weight such as a clay ball, marble, or metal washer. A stopwatch and measuring tape round out the kit. The safety note on the sheet flags that dropping from height requires a chair or step stool used with adult permission and a clear test area free of people, pets, and breakables.

Printing Tips
Standard 20-lb copy paper works fine here since students write only in the data table and conclusion lines. Slide the sheet into a clipboard so your homeschooler can record times at the drop site without chasing loose paper across the room.