Creative Minds 𖹭 Happy Hearts

Building a Model of a Volcano with Internal Layers
Layer by layer, building a model of a volcano reveals what sits beneath Earth’s surface in a way a textbook diagram simply cannot match.
Building a model of a volcano with internal layers puts Earth science into your student’s hands at a grade 4 to 6 level. The sheet walks through a ten-step procedure using modeling clay in multiple colors to represent the mantle, magma chamber, crust, main vent, volcano cone, and crater. Students label each layer with toothpicks, answer four Think and Answer questions about magma movement, and complete a diagram in the Observations section by drawing and labeling the cross-section they just built.
This lab fits naturally into an Earth science unit on plate tectonics, volcanology, or the layers of the Earth. It works as a standalone session or as a hands-on anchor for a longer unit study on geological processes. By the end, your homeschooler can name each internal layer, explain the path magma travels from the chamber to the surface, and describe why volcanoes form cone shapes, demonstrating both vocabulary and conceptual understanding.
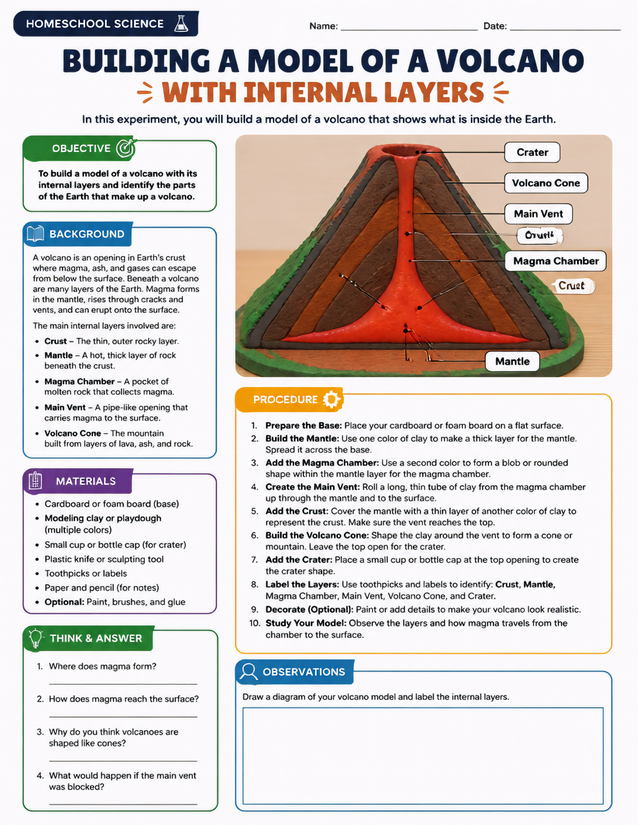
Grades 4 to 6 homeschoolers explore Earth science by building a model of a volcano that reveals crust, mantle, and magma chamber layers.
Investigating Building a Model of a Volcano in Your Homeschool Lab

Usage Notes
Cardboard or foam board forms the base, and modeling clay or playdough in multiple colors handles the layered construction. All supplies are standard household or craft store items, with paint and brushes listed as optional for a finishing step. The plastic knife or sculpting tool used to shape clay warrants a brief reminder about careful handling, especially for younger students working independently.

Printing Tips
Eighty-pound cardstock holds up better than copy paper when students rest their hands on the sheet while writing during the build. Print one copy per student and slip it into a protective sheet protector after the lab is complete so the labeled diagram and written answers stay readable alongside the finished clay model.